Does that make me sound like a nerd? Well, so be it. I'm talking about levelling. How do you know that your levelling is right? Easy question, easy answer. You just know. If it sounds good to you, it probably sounds good to someone else as well.
Make sure that the bass isn't too loud, it should be a guiding instrument. Just like you'll only miss it when it's not there any more. Drums should be seen in a similar way, except some parts should be well audible, such as a kick and snaredrum, but not too loud, say.. Slightly louder than the bass.
Guitars carry a song as well as vocals do, so you need these up front. Make them louder than the rest and the vocals even louder. If you have more guitarsparts, how can you find a good balance between these tracks?
First of all you need to determine if a guitarpart is just there to ride the wave or is it there to stand out? If it stands out, make it a little louder, if it doesn't a little softer.
This is very basic mixing right here and doesn't work in a lot of cases. Why did I put it up like this? Well, if you're still learning I noticed this is a good point of view and from here on you can finish the mix to your own taste. As for all the other parts, the most important thing is to listen to the song. What does it need and what kind of mood do you want to create? Listen and practice, these are the best tips I can give anyone who's still learning such as myself.
I probably did a lot of things wrong in the last couple of posts, but that doesn't matter. This is a blog about our current views on home recording and our own experiences. Sure some things need some work, but creativity is a long lasting process. So get out and record and enjoy. That's what's most important.
Friday, October 20, 2006
Thursday, October 19, 2006
Thank god for autotune
Now we're up to the next step, vocals. Vocals can be processed in many ways and this is mine. First of all, I have a few vocal plug-ins, Antares and Voxengo and I use them both. First of all I use the Voxengo Voxformer for general vox compression and to add a little more body to the vocals. From the Antares vocalpack, I use the Avox Throat to level the vocals and the Avox Punch to give it a little extra feeling. After this I use the multiband compressor for all the de-essing that needs to be done.
Now I use a little reverb to make the vocals a little warmer. It seems some sound engineers choose to not do that and just use the clear vocals, but I think that sucks and therefor I won't do it, ever. Just add a little big reverb, if you know what I mean. If not, I mean a reverb which gives you the idea you're in a large hall all by yourself. But just a tiny little bit of it. Unless you mean it that way ofcourse.
And this is the fun part. It's nearly impossible to sing without imperfections. Little imperfections that is, if the vocals are way off, you just need to re-record them. For this we've got a thing called Antares Autotune. This can gently correct a pitch when it is off. For instance if you have to keep a certain note for a while, it's very possible you get a little glitch somewhere in that period. If you find it correct it in midi and well... RTFM, I would say. I could spell it all out for you, but this is more fun to find out on your own.
That's it for the plug-in part. Now you're off to levelling it all. Next time I'll talk how I levelled and what I think is important in for a good mix.
Wednesday, October 18, 2006
Headbangingly heavy
And we're up to the next step already! Guitars and what not. To mix these first of all I used the compresser preset for electric guitar and added a little reverb to it. Or a lot, depending on the sound you want ofcourse. After that a lot of sound engineers use gating to get rid of the noise when there is no playing. I don't like that. So therefor my way requires a little bit more work, but I think my way sounds better.
First of all I muted the parts where the guitar wasn't welcome. Secondly, if this cuts off a sound, I let it fade out. This way there aren't any sudden stops in the sound and lets it all glide off gently.
EQ-ing guitars is a whole other story. For this I used the spectrum analyzer built-in with Cubase SX3 and used the hamming method. Why? I don't know. I was told this was the general way to do this, so I did it. Some things you do not question.
Now I can see which frequencies needed to be cut and which needed to be boosted. For example, a diagram shows that 108 Hz is highly available. Then I use a high pass filter on the 108 Hz and I usually use a low pass filter around the 12 kHz for all noise. Then I boost the midsection and high-midsection untill I get a sound which satisfies me.
Because we've got 2 guitarplayers and therefor 2 guitarparts, I panned one to the left and one to the right. Not hard though. Around 65 both ways is enough. Sometimes it's fun to use a little stereospread on one and a large one on the other. This makes it pretty freaky, but then again funny. It's cool to experiment. Go ahead do it.
After this you could process some modulation like chorus or flanger, but that's up to you. Next up : Vocals.. Oh boy.
Friday, October 13, 2006
Now gimme a bass
Why does it always seem my own instrument needs little work? Probably because the bass is a fairly simple instrument. But that's beside the point. How to mix the bass? Well, I used, yet again, the multiband compressor within Cubase and used the preset for a bassguitar. That's it for plugin's, unless you want some modulation, than you can edit that. As you can read in our recording posts, we've recorded the bass into two channels, DI-ed and miked. One is panned to the left and the other is panned to the right. This way you get a swell stereo effect which no plugin can create for you. Further more you need to EQ it a little so you don't get interference with the bassdrum. Remember? Boost, high Q, 100 Hz? Boost, low Q, 2 kHz? Same story except the boost becomes a cut. That's it!
Whoa strong story eh? Don't worry. Guitars and vocals are a lot of fun to mix, especially vocals. [insert evil laugh here]
Whoa strong story eh? Don't worry. Guitars and vocals are a lot of fun to mix, especially vocals. [insert evil laugh here]
Monday, October 09, 2006
I hope you've got a lot of spare time
In my opinion this is the part which needs the most work and therefor the most time. What the hell I'm talking about? Drums ofcourse.
To begin at the beginning. I will take this one step at a time, because it is the easiest way to show what we've done. We've got 8 tracks for the drums, i.e. :
1) Bassdrum
2) Snare
3) Hihat
4) High Tom
5) Mid Tom
6) Low Tom
7) Overhead #1
8) Overhead #2
1) Bassdrum
At first I've used the multibandcompressor which comes with Cubase SX3. In this plugin there is a preset for bassdrums. I altered this preset a little to make the kick stand out a little more. The low frequencies are boosted a little bit around 1.0 on top of the settings. This to get a little more kick to it. After this I've used the noisegate which is included in the VST dynamics which is also included in Cubase. I gate this using the autogate preset, but adjusting the treshold and the attack and release to get a big attack and a short release. After this, is EQ-ing baby!!
The EQ in this particular thing is very limited in my opinion. I use a boost around the 100 Hz with a big Q (around 9) and a boost with a low Q (0.2) in the 1 - 3 kHz section. Just move around a little, you'll hear when it sounds good. Boosting these regions means it is going to interfere with the bassguitar, so you got to cut these regions there, but that's for a later concern. Why boost these frequencies? If you have a simple audio system (for example a car stereo or mp3-player) it doesn't get all the low frequencies, therefor you will lose all sense of a bassdrum. It's just gone! That can't happen ofcourse.

2) Snaredrum
It's a pity it's only one track. Even now I still feel we should have needed a snare bottom track, but that though and we'll have to work with it. Ok, back to business. Compressing the snaretrack is done in a similar as the bassdrum, but then use the snare preset and boost the upper regions, but again just a little, not too much. Gating this isn't that complicated either, use the autogate function in VST dynamics and place the treshold in a way you hear enough, same goes for attack (rather big) and release (short). EQ-ing is different for every song. One song needs a low pounding snare, while the other one needs a high whacking sound. So use your imagination here.
3) High, Mid and Low Tom
All three? Yep, all three, because they're basically the same thing. In all honesty I'm not totally happy with the sound I have now, so this probably is going to be altered in the near future. At first I used the compressor and boosted the low regions with 2.5 and the higher regions with 1.0, after that I altered the characteristics a bit. Then gating is the real problem, well in my opinion. I used the gate with a big attack and a short release, but the sound I get isn't really satisfying. I'll get back to this when I've found out a good setting.
Panning the toms is cool ofcourse and therefor I've panned the high tom to the left, mid tom center and low tom to the right. Do not go to extremes panning these things. It gives the listener the idea that the drums are as wide as an entire stage.
Update:
Ok. I've been messing around quite a bit now and I've found a few settings which work great for me. First I gate the whole shebang with a big attack, small release and a hold around the 50 ms. After this I use the compressor in the VST dynamics plug-in and use a 4.0 : 1 ratio, same attack and release and a boost in the gain. It looks something like this.
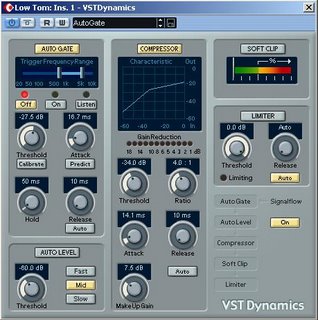
This works fine for me, so therefor I do it like this. Sue me!
4) Overheads
First I panned Overhead #1 to the hard left and Overhead #2 to the hard right to create the sense of space. After that I've used a compressor and the preset for an entire drumtrack. After that I boost the upper regions of the frequencies to a satisfying pitch of crashes and that's it for editing tracks.
5) Mixing the whole shebang
Make sure the bassdrum and snare are well heard and if you choose to use the hihat track, you can boost the EQ between the 9 and 12 kHz with a big Q to give a better sound to it. Then find a passage in the song in which the crashes are being hit. Slowly bring up the overheads to a level at which you can distinctly hear the crashes, but they don't overshadow the whole drumtrack. After this you can bring up the toms to a satisfying level, but make sure it doesn't get the main attention in the drumtrack. Bassdrum and snare are the instruments which supply the rhythm. Good luck and I'll get back to you when the tom's are well mixed in my songs.
Subscribe to:
Comments (Atom)