We've experimented a little. Why not? How do you record when you try to do it all live in a limited space? Well, we did it in our practice area. It's a room about 4x5 metre. What did we do? Well, we recorded the drums over 4 tracks, bassdrum, snare and two overheads. The overheads were placed at the height of the toms and crossed right above the bassdrum. This worked out great. But that's later. The guitars were miked with our audiotechnika mike and we've bought a MXL 990 which we also used for a guitar amp. Vocals were done with a phonic and a superlux mike which both aren't that great, but it'll have to work because we don't have anything else. The bass was once again really easy, we plugged it right into the mixing panel.
Press record and play. We've recorded around 70 minutes of material and had a lot of fun doing it. We always act a little wacky during recording sessions.
After this we needed to mix it all. Gating isn't really an option here in my opinion except for the bassdrum. We mixed the tracks the same way as always except we didn't gate the snare, guitars and vocals. This to keep the feel of a live recording.
I haven't really mastered it yet. A little quick with an EQ, a filter, denoiser and stereo spread, but nothing much. When that has happened in a respectable manner, you'll probably be hearing some of our stuff.
Friday, November 03, 2006
Friday, October 20, 2006
Just like World of Warcraft
Does that make me sound like a nerd? Well, so be it. I'm talking about levelling. How do you know that your levelling is right? Easy question, easy answer. You just know. If it sounds good to you, it probably sounds good to someone else as well.
Make sure that the bass isn't too loud, it should be a guiding instrument. Just like you'll only miss it when it's not there any more. Drums should be seen in a similar way, except some parts should be well audible, such as a kick and snaredrum, but not too loud, say.. Slightly louder than the bass.
Guitars carry a song as well as vocals do, so you need these up front. Make them louder than the rest and the vocals even louder. If you have more guitarsparts, how can you find a good balance between these tracks?
First of all you need to determine if a guitarpart is just there to ride the wave or is it there to stand out? If it stands out, make it a little louder, if it doesn't a little softer.
This is very basic mixing right here and doesn't work in a lot of cases. Why did I put it up like this? Well, if you're still learning I noticed this is a good point of view and from here on you can finish the mix to your own taste. As for all the other parts, the most important thing is to listen to the song. What does it need and what kind of mood do you want to create? Listen and practice, these are the best tips I can give anyone who's still learning such as myself.
I probably did a lot of things wrong in the last couple of posts, but that doesn't matter. This is a blog about our current views on home recording and our own experiences. Sure some things need some work, but creativity is a long lasting process. So get out and record and enjoy. That's what's most important.
Thursday, October 19, 2006
Thank god for autotune
Now we're up to the next step, vocals. Vocals can be processed in many ways and this is mine. First of all, I have a few vocal plug-ins, Antares and Voxengo and I use them both. First of all I use the Voxengo Voxformer for general vox compression and to add a little more body to the vocals. From the Antares vocalpack, I use the Avox Throat to level the vocals and the Avox Punch to give it a little extra feeling. After this I use the multiband compressor for all the de-essing that needs to be done.
Now I use a little reverb to make the vocals a little warmer. It seems some sound engineers choose to not do that and just use the clear vocals, but I think that sucks and therefor I won't do it, ever. Just add a little big reverb, if you know what I mean. If not, I mean a reverb which gives you the idea you're in a large hall all by yourself. But just a tiny little bit of it. Unless you mean it that way ofcourse.
And this is the fun part. It's nearly impossible to sing without imperfections. Little imperfections that is, if the vocals are way off, you just need to re-record them. For this we've got a thing called Antares Autotune. This can gently correct a pitch when it is off. For instance if you have to keep a certain note for a while, it's very possible you get a little glitch somewhere in that period. If you find it correct it in midi and well... RTFM, I would say. I could spell it all out for you, but this is more fun to find out on your own.
That's it for the plug-in part. Now you're off to levelling it all. Next time I'll talk how I levelled and what I think is important in for a good mix.
Wednesday, October 18, 2006
Headbangingly heavy
And we're up to the next step already! Guitars and what not. To mix these first of all I used the compresser preset for electric guitar and added a little reverb to it. Or a lot, depending on the sound you want ofcourse. After that a lot of sound engineers use gating to get rid of the noise when there is no playing. I don't like that. So therefor my way requires a little bit more work, but I think my way sounds better.
First of all I muted the parts where the guitar wasn't welcome. Secondly, if this cuts off a sound, I let it fade out. This way there aren't any sudden stops in the sound and lets it all glide off gently.
EQ-ing guitars is a whole other story. For this I used the spectrum analyzer built-in with Cubase SX3 and used the hamming method. Why? I don't know. I was told this was the general way to do this, so I did it. Some things you do not question.
Now I can see which frequencies needed to be cut and which needed to be boosted. For example, a diagram shows that 108 Hz is highly available. Then I use a high pass filter on the 108 Hz and I usually use a low pass filter around the 12 kHz for all noise. Then I boost the midsection and high-midsection untill I get a sound which satisfies me.
Because we've got 2 guitarplayers and therefor 2 guitarparts, I panned one to the left and one to the right. Not hard though. Around 65 both ways is enough. Sometimes it's fun to use a little stereospread on one and a large one on the other. This makes it pretty freaky, but then again funny. It's cool to experiment. Go ahead do it.
After this you could process some modulation like chorus or flanger, but that's up to you. Next up : Vocals.. Oh boy.
Friday, October 13, 2006
Now gimme a bass
Why does it always seem my own instrument needs little work? Probably because the bass is a fairly simple instrument. But that's beside the point. How to mix the bass? Well, I used, yet again, the multiband compressor within Cubase and used the preset for a bassguitar. That's it for plugin's, unless you want some modulation, than you can edit that. As you can read in our recording posts, we've recorded the bass into two channels, DI-ed and miked. One is panned to the left and the other is panned to the right. This way you get a swell stereo effect which no plugin can create for you. Further more you need to EQ it a little so you don't get interference with the bassdrum. Remember? Boost, high Q, 100 Hz? Boost, low Q, 2 kHz? Same story except the boost becomes a cut. That's it!
Whoa strong story eh? Don't worry. Guitars and vocals are a lot of fun to mix, especially vocals. [insert evil laugh here]
Whoa strong story eh? Don't worry. Guitars and vocals are a lot of fun to mix, especially vocals. [insert evil laugh here]
Monday, October 09, 2006
I hope you've got a lot of spare time
In my opinion this is the part which needs the most work and therefor the most time. What the hell I'm talking about? Drums ofcourse.
To begin at the beginning. I will take this one step at a time, because it is the easiest way to show what we've done. We've got 8 tracks for the drums, i.e. :
1) Bassdrum
2) Snare
3) Hihat
4) High Tom
5) Mid Tom
6) Low Tom
7) Overhead #1
8) Overhead #2
1) Bassdrum
At first I've used the multibandcompressor which comes with Cubase SX3. In this plugin there is a preset for bassdrums. I altered this preset a little to make the kick stand out a little more. The low frequencies are boosted a little bit around 1.0 on top of the settings. This to get a little more kick to it. After this I've used the noisegate which is included in the VST dynamics which is also included in Cubase. I gate this using the autogate preset, but adjusting the treshold and the attack and release to get a big attack and a short release. After this, is EQ-ing baby!!
The EQ in this particular thing is very limited in my opinion. I use a boost around the 100 Hz with a big Q (around 9) and a boost with a low Q (0.2) in the 1 - 3 kHz section. Just move around a little, you'll hear when it sounds good. Boosting these regions means it is going to interfere with the bassguitar, so you got to cut these regions there, but that's for a later concern. Why boost these frequencies? If you have a simple audio system (for example a car stereo or mp3-player) it doesn't get all the low frequencies, therefor you will lose all sense of a bassdrum. It's just gone! That can't happen ofcourse.

2) Snaredrum
It's a pity it's only one track. Even now I still feel we should have needed a snare bottom track, but that though and we'll have to work with it. Ok, back to business. Compressing the snaretrack is done in a similar as the bassdrum, but then use the snare preset and boost the upper regions, but again just a little, not too much. Gating this isn't that complicated either, use the autogate function in VST dynamics and place the treshold in a way you hear enough, same goes for attack (rather big) and release (short). EQ-ing is different for every song. One song needs a low pounding snare, while the other one needs a high whacking sound. So use your imagination here.
3) High, Mid and Low Tom
All three? Yep, all three, because they're basically the same thing. In all honesty I'm not totally happy with the sound I have now, so this probably is going to be altered in the near future. At first I used the compressor and boosted the low regions with 2.5 and the higher regions with 1.0, after that I altered the characteristics a bit. Then gating is the real problem, well in my opinion. I used the gate with a big attack and a short release, but the sound I get isn't really satisfying. I'll get back to this when I've found out a good setting.
Panning the toms is cool ofcourse and therefor I've panned the high tom to the left, mid tom center and low tom to the right. Do not go to extremes panning these things. It gives the listener the idea that the drums are as wide as an entire stage.
Update:
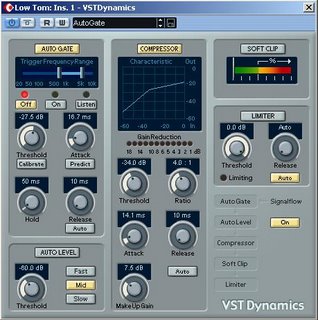
Ok. I've been messing around quite a bit now and I've found a few settings which work great for me. First I gate the whole shebang with a big attack, small release and a hold around the 50 ms. After this I use the compressor in the VST dynamics plug-in and use a 4.0 : 1 ratio, same attack and release and a boost in the gain. It looks something like this.
This works fine for me, so therefor I do it like this. Sue me!
4) Overheads
First I panned Overhead #1 to the hard left and Overhead #2 to the hard right to create the sense of space. After that I've used a compressor and the preset for an entire drumtrack. After that I boost the upper regions of the frequencies to a satisfying pitch of crashes and that's it for editing tracks.
5) Mixing the whole shebang
Make sure the bassdrum and snare are well heard and if you choose to use the hihat track, you can boost the EQ between the 9 and 12 kHz with a big Q to give a better sound to it. Then find a passage in the song in which the crashes are being hit. Slowly bring up the overheads to a level at which you can distinctly hear the crashes, but they don't overshadow the whole drumtrack. After this you can bring up the toms to a satisfying level, but make sure it doesn't get the main attention in the drumtrack. Bassdrum and snare are the instruments which supply the rhythm. Good luck and I'll get back to you when the tom's are well mixed in my songs.
To begin at the beginning. I will take this one step at a time, because it is the easiest way to show what we've done. We've got 8 tracks for the drums, i.e. :
1) Bassdrum
2) Snare
3) Hihat
4) High Tom
5) Mid Tom
6) Low Tom
7) Overhead #1
8) Overhead #2
1) Bassdrum
At first I've used the multibandcompressor which comes with Cubase SX3. In this plugin there is a preset for bassdrums. I altered this preset a little to make the kick stand out a little more. The low frequencies are boosted a little bit around 1.0 on top of the settings. This to get a little more kick to it. After this I've used the noisegate which is included in the VST dynamics which is also included in Cubase. I gate this using the autogate preset, but adjusting the treshold and the attack and release to get a big attack and a short release. After this, is EQ-ing baby!!
The EQ in this particular thing is very limited in my opinion. I use a boost around the 100 Hz with a big Q (around 9) and a boost with a low Q (0.2) in the 1 - 3 kHz section. Just move around a little, you'll hear when it sounds good. Boosting these regions means it is going to interfere with the bassguitar, so you got to cut these regions there, but that's for a later concern. Why boost these frequencies? If you have a simple audio system (for example a car stereo or mp3-player) it doesn't get all the low frequencies, therefor you will lose all sense of a bassdrum. It's just gone! That can't happen ofcourse.

2) Snaredrum
It's a pity it's only one track. Even now I still feel we should have needed a snare bottom track, but that though and we'll have to work with it. Ok, back to business. Compressing the snaretrack is done in a similar as the bassdrum, but then use the snare preset and boost the upper regions, but again just a little, not too much. Gating this isn't that complicated either, use the autogate function in VST dynamics and place the treshold in a way you hear enough, same goes for attack (rather big) and release (short). EQ-ing is different for every song. One song needs a low pounding snare, while the other one needs a high whacking sound. So use your imagination here.
3) High, Mid and Low Tom
All three? Yep, all three, because they're basically the same thing. In all honesty I'm not totally happy with the sound I have now, so this probably is going to be altered in the near future. At first I used the compressor and boosted the low regions with 2.5 and the higher regions with 1.0, after that I altered the characteristics a bit. Then gating is the real problem, well in my opinion. I used the gate with a big attack and a short release, but the sound I get isn't really satisfying. I'll get back to this when I've found out a good setting.
Panning the toms is cool ofcourse and therefor I've panned the high tom to the left, mid tom center and low tom to the right. Do not go to extremes panning these things. It gives the listener the idea that the drums are as wide as an entire stage.
Update:
Ok. I've been messing around quite a bit now and I've found a few settings which work great for me. First I gate the whole shebang with a big attack, small release and a hold around the 50 ms. After this I use the compressor in the VST dynamics plug-in and use a 4.0 : 1 ratio, same attack and release and a boost in the gain. It looks something like this.

This works fine for me, so therefor I do it like this. Sue me!
4) Overheads
First I panned Overhead #1 to the hard left and Overhead #2 to the hard right to create the sense of space. After that I've used a compressor and the preset for an entire drumtrack. After that I boost the upper regions of the frequencies to a satisfying pitch of crashes and that's it for editing tracks.
5) Mixing the whole shebang
Make sure the bassdrum and snare are well heard and if you choose to use the hihat track, you can boost the EQ between the 9 and 12 kHz with a big Q to give a better sound to it. Then find a passage in the song in which the crashes are being hit. Slowly bring up the overheads to a level at which you can distinctly hear the crashes, but they don't overshadow the whole drumtrack. After this you can bring up the toms to a satisfying level, but make sure it doesn't get the main attention in the drumtrack. Bassdrum and snare are the instruments which supply the rhythm. Good luck and I'll get back to you when the tom's are well mixed in my songs.
Tuesday, September 26, 2006
Pavarotti ain't got ^#$* on me
As we had only one additional instrument to record, I will quickly discuss this here and for the rest it'll be vocals, baby, all vocals.
The additional instrument which we recorded was a didgeridoo. The song we were recording required a D-note. However, the didgeridoo supplied, as it seemed later on, a whole other note. This was easily fix with Auto-tune from Anteres, but we are getting way ahead of ourselves here! We had the condeser mic placed under the didgeridoo and placed a popfilter in front of it. We pressed record, our guitarplayer took a woof of air and played. End of sequence. That's it!
Vocals however seemed to require a bit more work to record. Because of all the noise reflection of the room we had a blanket placed over a speaker in front of us. Like this:

Furthermore, we placed a popfilter (or in our band called "spitscreen") in front of the condenser mic and had a closed pair of headphones on. Because vocals need power on actual recordings we took a bit distance (a tiny bit of distance though, or else you get a lot of ambient room sound with it) and sung a bit louder that we usually do. Also, this condenser mic was very sensitive, so we pressed the headphones a bit more to our ears.


That's it. Just sing and remember to press record. That's it for my view on the subject. I've invited another band member with whom I recorded to join this blog and post his adventures and views concerning the recording process. I, on the other hand, will continue to the mixing part of this journey. That's when the fun starts.
The additional instrument which we recorded was a didgeridoo. The song we were recording required a D-note. However, the didgeridoo supplied, as it seemed later on, a whole other note. This was easily fix with Auto-tune from Anteres, but we are getting way ahead of ourselves here! We had the condeser mic placed under the didgeridoo and placed a popfilter in front of it. We pressed record, our guitarplayer took a woof of air and played. End of sequence. That's it!
Vocals however seemed to require a bit more work to record. Because of all the noise reflection of the room we had a blanket placed over a speaker in front of us. Like this:
Furthermore, we placed a popfilter (or in our band called "spitscreen") in front of the condenser mic and had a closed pair of headphones on. Because vocals need power on actual recordings we took a bit distance (a tiny bit of distance though, or else you get a lot of ambient room sound with it) and sung a bit louder that we usually do. Also, this condenser mic was very sensitive, so we pressed the headphones a bit more to our ears.
That's it. Just sing and remember to press record. That's it for my view on the subject. I've invited another band member with whom I recorded to join this blog and post his adventures and views concerning the recording process. I, on the other hand, will continue to the mixing part of this journey. That's when the fun starts.
Friday, September 22, 2006
Jimi Hendrix is a wuss
Guitars. Terrible instruments. Well, to record in my opinion. As we recorded our guitar parts in multiple sessions, we got 2 different sounds. How the hell did this happen? Well. If you mess with the EQ on your amp, you mess with the recorded sounds. But that's an all other thing.
How to record such a thing? Well, we as a rock band have a lot of distorted parts. It seems that when you record a distorted sound too loud, you get a signal with a lot of flat tops. So first of all you turn down the gain/volume knob. It has to be relatively soft as compared to the sound that you are used to in the space used for band practice. Then we placed our condenser mic in the same way we placed the mic for the recording of the bass. Slightly to the side of the cone, but pointing directly towards it.
N.B. Because of our budget trouble we aren't in the possession a great tube amps, so therefor we had to work with transistor amps. It worked, but the sound gets a lot better if you use a tube amp, a lot warmer.
We only recorded the guitar in two ways, clean and distorted. Any other effects, such as tremolo, chorus and flanger, are put over the tracks during the mixing, so that you can get the perfect sound that you are looking for. Later a bit more about that.
The problem while recording this "soft" is that you easily can get some room noise to go along with it. So what you need at first is a closed pair of headphones and simply to be very, very quiet (like you're hunting wabbits). As we were going for the strumming noise as well, we needed to remain in the same space as where the amp was, other wise you can easily solve this problem by putting the amp in another room, or yourselves for that matter.
Another problem we encountered is because of the fact we've got two guitar players. Our other guitar player started complaining about the fact that he couldn't hear himself no matter how loud his signal was. This is very easily solved by muting his signal so he understands that he's out of his mind.
Don't mind the sound you get scraping over the strings to get another chord. It isn't annoying and even the best guitar players have that trouble. Even Jimi.
Thursday, September 21, 2006
Deep thoughts for deep sounds
A lot of sound engineers record the bass by plugging it into a DI and work with that sound. Some sound engineers prefer the miking method. We did both.
We always like the strumming sound with our string instruments and therefor we had no other choice but to mike the bass amp. We miked the amp using the bassdrum mic from our drummic kit. The amp we used could be a little tilted, we did that and then we placed the mic slightly to the right of the cone but pointing to it.
However, this particular bass amp, Ibanez Soundwave 100, had an option to DI it as well as there was an XLR direct out port. At first we thought to use either one of them to look which one sounded better. Well, too bad. They both sounded great.
Now we decided to use both of them simultaneously, but I'll get back on that when we get to the mixing part. That's it for bass already. Press record and play.
Note :
If you try to use a bass-distortion pedal it totally messes up the sound while recording through a DI. You get a big, fuzzy, distorted and relatively high buzz in stead of a deep distorted bass sound. It is recommended if you want the true distorted bass sound as it appears on other recordings, you have to mike the bass amp. If you have an effect unit on bass which produces an analog sound, you can DI that. On other sounds I haven't got a clue, but these things were noticed during our recording session.
Wednesday, September 20, 2006
Hit it
How to start recording?
Well somehow we learned to start in a particular order :
1) Drums + Percussion
2) Bass
3) Guitar
4) Additional instruments
5) Vocals
So at first we recorded the drums. We had 7 drum mics, i.e.:
1 Bassdrum mic
1 Snare mic
3 Tom mics
2 Overhead mics
Because we had another XLR port left in our firewire mixer we decided to use the extra port for a hihat mic. Placed from the above to get the stick hitting the hihat in our sound, like this :

Only it seemed we could've used the extra XLR for something else. The hihat is heard pretty good in the OH's and therefor the hihattrack is muted or else it would've been too much hihat in the drumtrack. Our other problem this way is the absence of a real snaredrum hit. If you remove the snares from the drum, hit it and the sound you get then is almost the sound that we have. That sucks. We should have used the extra port for the snare bottom to get that real hit-effect. No harm no foul. Thank god for VST instruments.
We placed the overhead mics about 60 - 70 cm above the drumkit on both sides. Because our drummer has a lot of crashes (11!!) we had to spread the mics pretty wide to get everything at the same level. Although a lot of crashes we're picked up by other mics as well, we couldn't help but spread those two because of all the gating which was going to be done when the mixing started.

The other mics were placed as usual and therefor, the recording could begin. Oh one other note to remember!! If you going to record with the artist this close to the mics, make sure the headphones are closed. We had to gate almost everything because of the clicks from the clicktrack. It's a pity, cause gating isn't always the way to go!
We also recorded a wooden block being hit by our guitarplayer. This time we used our Audiotechnika condenser mic. I have to say, condenser sounds awesome. We intended it to be played the entire song, but there is an invention called copy and paste.
How would the drummer know what to play and where to play it?
Good call! It seems that usually the bassplayer and/or guitarplayer plays along with the drummer to give him the perfect idea of where the song is. Because of technical difficulties we decided to go another way and give him the vocals as well. Before we started to record the drums, we made a few pre-recordings of the guitar and vocals simply DI-ed these and used a VST plugin amp to make it at least sound a little like a guitar and vocals. This however requires a skilled guitarplayer who can stay on the beat. If you got that I recommend that you do it this way IF you are going to use a clicktrack. If not, then record the whole bunch live so you at least have a good feel for it.
But why this way? As a musician you always listen to the rhythmic part of the song for the tempo, so the musician just plays along with the drums (unless there is a quiet part for the drums of course) and the drummer has to concentrate on both things. In my experience, which isn't much I acknowledge that, drummers find that pretty much irritating. Therefor if you pre-record this stuff, the guitar player minds the clicktrack, which, in his subconscious, he always does while playing, so there's a lot less trouble for your guitarplayer. The drummer can play on the clicktrack and if he doesn't know where he is anymore, he listens to the guitarpart. In any other way, it results in pure chaos. Trust me, I've seen it. It ain't pretty.
Well somehow we learned to start in a particular order :
1) Drums + Percussion
2) Bass
3) Guitar
4) Additional instruments
5) Vocals
So at first we recorded the drums. We had 7 drum mics, i.e.:
1 Bassdrum mic
1 Snare mic
3 Tom mics
2 Overhead mics
Because we had another XLR port left in our firewire mixer we decided to use the extra port for a hihat mic. Placed from the above to get the stick hitting the hihat in our sound, like this :
Only it seemed we could've used the extra XLR for something else. The hihat is heard pretty good in the OH's and therefor the hihattrack is muted or else it would've been too much hihat in the drumtrack. Our other problem this way is the absence of a real snaredrum hit. If you remove the snares from the drum, hit it and the sound you get then is almost the sound that we have. That sucks. We should have used the extra port for the snare bottom to get that real hit-effect. No harm no foul. Thank god for VST instruments.
We placed the overhead mics about 60 - 70 cm above the drumkit on both sides. Because our drummer has a lot of crashes (11!!) we had to spread the mics pretty wide to get everything at the same level. Although a lot of crashes we're picked up by other mics as well, we couldn't help but spread those two because of all the gating which was going to be done when the mixing started.
The other mics were placed as usual and therefor, the recording could begin. Oh one other note to remember!! If you going to record with the artist this close to the mics, make sure the headphones are closed. We had to gate almost everything because of the clicks from the clicktrack. It's a pity, cause gating isn't always the way to go!
We also recorded a wooden block being hit by our guitarplayer. This time we used our Audiotechnika condenser mic. I have to say, condenser sounds awesome. We intended it to be played the entire song, but there is an invention called copy and paste.
How would the drummer know what to play and where to play it?
Good call! It seems that usually the bassplayer and/or guitarplayer plays along with the drummer to give him the perfect idea of where the song is. Because of technical difficulties we decided to go another way and give him the vocals as well. Before we started to record the drums, we made a few pre-recordings of the guitar and vocals simply DI-ed these and used a VST plugin amp to make it at least sound a little like a guitar and vocals. This however requires a skilled guitarplayer who can stay on the beat. If you got that I recommend that you do it this way IF you are going to use a clicktrack. If not, then record the whole bunch live so you at least have a good feel for it.
But why this way? As a musician you always listen to the rhythmic part of the song for the tempo, so the musician just plays along with the drums (unless there is a quiet part for the drums of course) and the drummer has to concentrate on both things. In my experience, which isn't much I acknowledge that, drummers find that pretty much irritating. Therefor if you pre-record this stuff, the guitar player minds the clicktrack, which, in his subconscious, he always does while playing, so there's a lot less trouble for your guitarplayer. The drummer can play on the clicktrack and if he doesn't know where he is anymore, he listens to the guitarpart. In any other way, it results in pure chaos. Trust me, I've seen it. It ain't pretty.
Tuesday, September 19, 2006
Mastering, Myths and Mystery
Today I've recieved a book called Mastering Audio by Bob Katz. Before I ordered it, I thought : "Sure I know a little about equalising, noise reduction, compressing, declicking and limiting. But how hard could it all be, right?" Later on I realised, a rookie error. Damn this is hard, but the mystique surrounding it is all a bit over the top as I've read on sound on sound. Well, sod off. It is hard.
I've been browsing around on the internet and mastered my first track this weekend. It sounded awful. Well, not that terrible, but not as good as I had hoped. Actually it sounded the same as before I mastered it. I feel like I have some good mastering plugins (the Virtos plugin set) and I manage EQ pretty good, but I'm doing something wrong. I can read. I'll find it out.
I've been browsing around on the internet and mastered my first track this weekend. It sounded awful. Well, not that terrible, but not as good as I had hoped. Actually it sounded the same as before I mastered it. I feel like I have some good mastering plugins (the Virtos plugin set) and I manage EQ pretty good, but I'm doing something wrong. I can read. I'll find it out.
All audiophiles like miked amps
At least that's what I think. I'm starting this blog cause I want to share my adventures on homerecording. What to use best, what to do if all else fails in a mix, how to record a certain instrument, how to mike an amp or drumkit and what if I use [enter plugin here] on [enter instrument track here]?
In all honesty I have to say I'm an amateur with a capital A. I've just dove in the world of homerecording and therefor don't have much knowledge and don't have much equipment. That doesn't matter though. I notice that the most important key to learn the procedure of producing a "commercial sounding" mix is to just do it. And we did.
I'm the lead singer and bassplayer in a band called HardlyEasy and we've recorded around 15 songs in July and August. We did this in 2 loads of 8 and 7 songs and the funny thing is. Our second load sounds a lot better then the first load. We did a few things differently and that's our result. We're in the mixing phase right now so as soon as we've got something. You'll know it.
Let me tell you what we were using to record these sessions :
- Phonic Helixboard 18 firewire;
- Audiotechika condensor mike;
- Superlux drum mike kit;
- Behringer DI 100;
- Cubase SX3 recording software.
So you can see, it's not much but we've got some fairly good results right now. And now, it's off to work. Or else I wouldn't have anything to talk about!
Subscribe to:
Comments (Atom)